|
|
 |
|
|
The Sessions window is displayed when you first run CMUD, or when you click the Sessions button in the main toolbar:
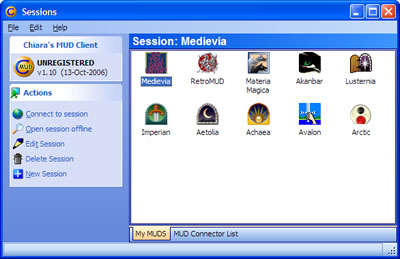
The main part of this screen shows an icon for each MUD session that you have defined. When you install CMUD for the first time, a set of pre-defined session icons are created for MUDs who have paid for this advertising. These pre-defined icons are for well-established MUDs with large player bases and are a good place for new MUD players to start.
To connect to one of these sessions, simply double-click on the icon, or click on an icon to select it, and then click the Connect action listed on the left.
If the MUD that you wish to play doesn't have an icon, click the "All MUDs" tab at the bottom of the window to open the full MUD Connector List. You can also click the New Session action on the left to manually enter the hostname and port number of the MUD you wish to connect to.
The actions listed on the left side of the window act upon the currently selected session icon:
- Connect to session
- Opens the session and connects to the hostname and port defined in the session.
- Open session offline
- Opens the session, but does not connect to the MUD. This is useful for editing your scripts without connecting to the game.
- Edit session
- Allows you to edit the properties of the session. See the Edit Session topic for more details.
- Delete session
- Deletes the selected session icons from the screen. You can select multiple session icons by clicking in an empty area of the icon panel and dragging a selection box around the icons. Or you can Ctrl-click on each icon that you want to select. The Delete session action will prompt for each selected session and ask if you wish to delete it.
- New session
- Creates a new session icon. It will prompt for the Title of the session, the Hostname and Port of the remote MUD server. To edit other properties of the session, use the Edit session action.
Using folders
You can create folders to organize your session icons. Right-click on session icon panel and select the New/Folder menu option. This command is also available in the File menu.
To rename a folder (or session icon), right-click on it and select the Rename option from the popup menu. You can also edit an icon title by clicking on the title shown below the icon twice (clicking once selects the icon, clicking on the title a second time allows you to rename it). This works just like the normal Windows File Explorer.
Once a folder has been created, you can click on a session icon and drag it over the folder and release the mouse button to drop the icon into the folder. Double-click the folder to open it and view the icons stored within the folder. When the folder is open, a folder with a title of ".." will be shown, which represents the parent folder. To move an icon out of the folder and back to the parent, drag the session icon and drop it over the ".." folder icon.
If the Show All command in the View menu is selected, then all session icons, no matter what folder they are stored in, will be displayed in the main icon screen.
Importing from zMUD
In the File menu, select the Import zMUD Sessions command. It will prompt you to locate your zMUD folder and will then show a list of sessions from zMUD. Select the sessions you wish to import. You can Ctrl-click to select multiple sessions. Finally, click the Import button to copy these sessions into CMUD. All of the files, such as the mapper files, databases, sounds, etc will be copied from your zMUD session folder into your CMUD session folder. The zMUD *.MUD settings file will be automatically converted into the CMUD *.PKG package file when you first open the session within CMUD.
Desktop session icons
You can click on a session icon and drag it to your Windows Desktop. This will create an icon on your desktop that can be used to launch the selected session directly. This will bypass the normal sessions window and is one of the quickest ways to connect to your MUD game session.
Unfortunately, because of how the Windows desktop works, the icon for the session will show the main CMUD application icon, and not the custom icon that you might have used within the CMUD session screen. Because the CMUD session screen uses external image files for the icons, and not Windows resources, there is no way for Windows to show this custom icon on the desktop.
Other menu commands
If you right-click on a session icon, several more options will be shown in the popup menu. You can Copy the icon, and then Paste it to create a copy of a session (just like with files in the Windows Explorer). You can also use the View and Arrange commands in the popup menu to change how the icons are displayed and how they are sorted.
Each session icon has Notes assigned to it. When you click on an icon to select it, these Notes are shown at the bottom of the window below the icons. You can turn this off using the Show Descriptions option in the Edit menu. If you double-click on the Notes panel, it will automatically open the Notes tab in the Edit Session screen to allow you to edit the Notes. |
|
