Updated:
by Mike Potter (Zugg)
Related Articles:
Creating a COM-based plugin for zMUD is fairly easy. With a bit
of practice and some basic understanding of COM and OLE-automation, you'll soon
be creating zMUD plugins that add all sorts of functionality to zMUD. You
can create COM-based plugins for zMUD in many different programming languages,
including Visual Basic, Delphi, C, C++, etc. This tutorial contains
examples for both Delphi and Visual Basic.
Terminology
zMUD Plugins can be written using two different methods: COM-based, and
API-based. API-based are traditional DLL files that export certain
procedures required by zMUD. This is the traditional method for creating
zMUD plugins and is described in more detail in the zMUD Developer's Kit.
This article covers COM-based plugins for zMUD. However, this
terminology is a bit misleading, since zMUD plugins are actually OLE Automation
Servers, which themselves are COM objects. Think of COM as a very general
framework, with OLE Automation Servers as a subset of that framework.
Specifically, all OLE Servers implement the IDispatch interface, rather than
the bare-bones IUnknown interface of regular COM objects. Any programming
language that you will create plugins with will handle the details of the
IDispatch interface, so you don't need to understand the details. However,
one important consequence of using OLE Automation Servers is that your plugin
will require a Type Library.
A Type Library is a set of information that describes your plugin and allows
it to be registered within Windows. The Type Library is typically linked
in with your DLL or EXE plugin file. Most programming languages allow you
to import and view type libraries, either installed on the system, or residing
in a DLL or EXE file.
zMUD itself has a Type Library called the "Zmud Library".
Simply load ZMUD.EXE into a Type Library viewer, or look for the Zmud Library in
the system registry.
To help with your plugin debugging, I've compiled a simple Type Library
viewer called TIViewer.exe.
This utility was written by Eric Harmon as part of his book "Delphi COM
Programming". Click on the filename above to download the
utility. It allows you to open a DLL or EXE file and view it's associated
type library.
The Basics
To create a zMUD Plugin, you need to create an OLE Automation Server that
implements the IzMUDPlugin interface. The IzMUDPlugin interface is defined
in the Zmud Type Library contained in ZMUD.EXE. I'll document all of the
methods and properties of this interface at the end of this document. The
IzMUDPlugin is simply an interface that describes the methods and properties
that you can implement in your plugin. Any OLE Automation Server that
implements this interface can be loaded into zMUD as a plugin. Some of the
methods and properties are required, many are optional.
So, pick whatever programming language you want to use, and learn how to
create an OLE Automation Server. I'm going to show a detailed example
using Delphi, and then in Visual Basic, but you should be able to create OLE Automation Servers in most
any language. It might take some practice to master the detailed steps
involved in creating an automation server.
Creating an OLE Automation Object in Delphi
Delphi 5 contains several wizards that make COM and OLE Automation very
easy. There are two types of automation servers that you can create:
in-process, and out-of-process. In-process servers are DLL library files
that end up getting loaded into the same memory space as zMUD when they are
running as plugins. These plugins run the fastest. Out-of-process
automation servers are EXE application programs that run alongside zMUD in a
separate memory space. Because data must be transferred back and forth
between the applications, these types of plugins run a bit slower than the
in-process DLL servers. However, since they are self-contained application
programs, you can do a bit more with them. For example, consider the zChat
plugin for zMUD. In addition to being a plugin, it is also a standalone
chat program. This is a good example of a zMUD plugin that should probably
be an out-of-process EXE plugin.
In the following detailed example, I'm going to create an in-process DLL
plugin. From the File menu, select New...and in the ActiveX tab page,
select the "Active X Library" to create a new library project.
Delphi will create a small DLL Library for you. Next, from the File menu,
select New...and in the ActiveX tag page, select the "Automation
Object".

Delphi will prompt you to name your OLE Automation Server object. Enter
a shortname for your object, without any spaces, in the CoClass Name
field. Leave the other fields at their default values, and click OK.
In this example, we will enter a name of "TestPlug"
Because you have created an Automation Object, Delphi will automatically
create a Type Library for you and load the Type Library Editor. In order
to implement the IzMUDPlugin interface, we need to edit this type library a bit
before it's ready.
By default, you'll see this in your Type Library editor:

Project1 is your DLL Library, ITestPlug is the default Interface for your OLE
Automation Object, and TestPlug is the object that implements the
interface. Now we just have to tell Delphi that we want to implement the
IzMUDPlugin interface in our object.
First, we need to load the zMUD Type Library into our project so that Delphi
can find the IzMUDPlugin interface. From the Project Menu, select Import
Type Library. Scroll to the bottom of the list, and if you have run zMUD
v6.05 on your system at least once, you'll see the zMUD Library entry.
Select it, then click the Create Unit button at the bottom of the window.
Accept the defaults and click OK. The unit ZMUD_TLB will be added to your
project. When you are bored someday, you might look through this
file. It contains all of the interface information for all of the OLE
Automation objects used by zMUD.
Now we've added the zMUD Type Library to our project, but we still need to
add it to the Type Library editor. Select the "Project1" line in
the Type Library editor. Then, on the right-side of the screen, click the
Uses tab. You'll notice that two type libraries are already being used,
but nothing else is shown. The trick here is to right-click on the
list of libraries, and select "Show All Type Libraries". Now
everything will be listed. Scroll down to the bottom, and click on the
checkbox next to the zMUD Library entry. What can I say...the user
interface of the Delphi Type Library is horrible (ok, I want to use even
stronger language than that, but I won't). Right-click on the list of
libraries and select "Show Selected" again. Now, your type
library list should look like this (your paths and folders will be different):

Good. Now that the Type Library Editor knows about zMUD, it's time to
fix the TestPlug object so that it implements the correct interface. Click
on the TestPlug object in the list on the left. Go to the Implements tab
on the right. Once again, right-click on the
interface list (aarggg) and select "Insert Interface" from the popup
menu. Select the IzMUDPlugin interface from the list.

Now, a very important step: click the "Refresh
Implementation" button in the toolbar of the Type Library editor.
It's the icon with the two green arrows on it. Clicking this button just
added a bunch of code to your object that will save you lots of typing. It
added all of the methods and properties for the IzMUDPlugin class, and builds
sample code for each one!! This is a huge time saver.
The final step involves a small bit of editing. Delphi never added the
ZMUD_TLB unit to the Uses clause of our object unit, so add this yourself.
The top of your code page should now read something like this:
unit Unit1;

interface

uses
  ComObj, ActiveX, Project1_TLB, StdVcl, ZMUD_TLB;

type
  TTestPlug = class(TAutoObject, ITestPlug, IzMUDPlugin)
  protected
    function Get_CanCapture: WordBool; safecall;
    .
    .
    .
Now, SAVE YOUR WORK!!! Select "Save Project As" from the File
menu. You will first be prompted for the name of your Automation Object
Unit (the Unit1 in the above diagram). Give your plugin file a good
name. I have chosen "TestCom.Pas" (ok, so it's a horrible
name). Next, you will be prompted for the name of your Project. This
is very important: The name of your project will also be the name
of your plugin DLL file. So, choose a really good name here.
I have chosen "TestPlugin" for my project name.
That's it...you have now created an IzMUDPlugin OLE Automation object in
Delphi. Now, you just need to add the detailed implementation of your
Plugin.
Implementing your Plugin
When you created your OLE Automation object, Delphi filled in a lot of
skeleton code for you. This included empty implementations of each method
and property used by the IzMUDPlugin interface. Most of these routines are
optional. Also, you will notice a striking similarity between the names of
the plugin methods and the names of the API routines from the zMUD Developer's
Kit. This makes converting an old API plugin into a new COM plugin very
easy.
The most important required method that you must implement is the
Register method. The skeleton code for this method looks like this:
procedure TTestPlug.Register(var Name, Company, Regcode, Description,
  Version, HelpFile: WideString; var LoadDef: WordBool);
begin

end;
Just like the RegisterPlugin routine in the zMUD Developer's Kit
documentation, the Register method requires that you fill in the Name of the
plugin, the Company (author) creating the plugin, your Developer's Kit
registration code, a short description of your plugin, the version string, the
name of the helpfile, and whether the plugin should be loaded by default.
Note that in v6.05 and later, plugins do not have to be registered
anymore. The license agreement for the zMUD Developer's Kit is being
rewritten. Plugins can now be created for personal use for free.
It's only when you want to distribute your plugin to other zMUD users that you
must pay the Developer's Kit registration fee. In either case, your plugin
will load into zMUD. If the plugin is not registered, the user will
get a message in the zMUD Plugin Manager stating that the plugin is not
registered.
So, an example implementation might look like this:
procedure TTestPlug.Register(var Name, Company, Regcode, Description,
  Version, HelpFile: WideString; var LoadDef: WordBool);
begin
  Name := 'Test Plugin';
  Company := 'Zugg Software';
  Regcode := '123456789012';
  Description := 'This is a test plugin that does not do anything';
  HelpFile := '';
  LoadDef := true;
end;
Compile your plugin using the "Compile" command in the Project
menu. You shouldn't get any errors if you have followed this tutorial
exactly.
Installing your Plugin
Now you must tell zMUD about your new plugin. There are two ways to do
this. A program called "zRegPlugin.exe" is included in the zMUD
Developer's Kit. Simply run this program and give your plugin filename as
the parameter. Your plugin will then be installed for zMUD. This
method is intended for professional plugin developers who can include a call to
zRegPlugin in their installer script.
For regular users, it is easier to install the plugin from within zMUD
itself. Run zMUD. At the character selection screen, press
<ESC> to get a blank, default MUD window. From the Plugins menu,
select the Install command.
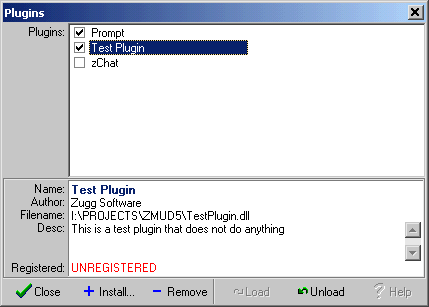
A list of currently installed plugins will be displayed:

When you select a plugin in the top list, information about the plugin
(obtained from the plugin's Register routine) is shown in the area below.
To install a new plugin, click the Install button. Locate your plugin file
(Testplugin.dll in the example case) and click Open. The new plugin will
be loaded into zMUD:

Notice that all the information that we entered into the Register method of
our OLE Automation object is shown here. To uninstall a plugin, click the
Remove button. The checkbox next to the plugin name indicated whether the
plugin is active and loaded. zMUD only calls the methods for active
plugins. You can Load and Unload plugins using the buttons on this form,
or just click the checkbox next to the plugin. Loading a plugin causes the
Init method of the plugin to be called. Unloading a plugin causes the
Close method of the plugin to be called. For example, if we check the box
next to the zChat plugin, zChat will be loaded into memory and will appear as a
blue-Z in our system tray. If we then uncheck the box, zChat will be
unloaded from memory. So, for some plugins, loading and unloading can take
a few seconds.
This Plugin Manager can handle both the new COM-based plugins, as well as the
older API-based plugins (such as the Prompt and zChat plugins shown here).
In case you need to mess with the low level details, information about what
plugins are installed is stored in the System Registry under the key:
HKEY_CURRENT_USER\Software\Zuggsoft\zMUD\Plugins
Detailed Description of Methods and Properties
Well, I promised a detailed look at all the methods and properties of the
IzMUDPlugin interface. But I'll save this information for the next public
version of the zMUD Developer's Kit. For now, go to the zMUD Developer's
Kit page (click on it from the main www.zuggsoft.com
page) and read about the API routines. The COM-based routines are very
similar to the API routines. This, plus the skeleton code that Delphi
generates should be enough to get you going for now.
Creating an OLE Automation Object in Visual Basic
Thanks to Zor for this section!
Creating a COM and OLE Automation object in Visual Basic is pretty easy since
Visual Basic does most of the work for you. Visual Basic can create both
in-process (DLL) and out-of-process (EXE) servers.
When you start Visual Basic you should be presented with the New Project
dialog shown below. If you have shut this option off you can select New
Project from the File menu.

If you want to create an in-process server you should select the
"ActiveX DLL" option - select the "ActiveX EXE" option if
you want to create an out-of-process server. In this example we will
create an in-process server using the ActiveX DLL project. It doesn't
matter which kind of server you want to write - Visual Basic handles them in
almost exactly the same way.
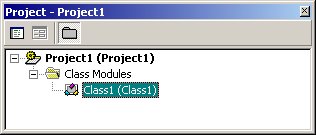
When you click on the Open button Visual Basic will create a blank project
with a single empty class - the project will be called Project1 and the class
will be called Class1. Since the program ID of your project in based on
the name of the project and the object you references is the name of the class
you will want to give them both descriptive names.

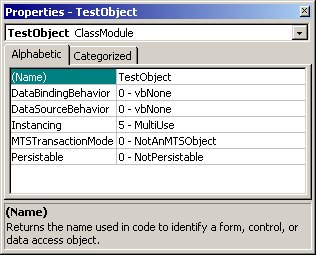
Click on Project1 and go to the properties window (press F4 as a handy
shortcut) and change the name to whatever you want - in this case I will call
the project TestPlugin.

Now do the same thing with Class1 - click on it in the Project window and
then change the name in the Properties window - in this example we will call the
class TestObject.

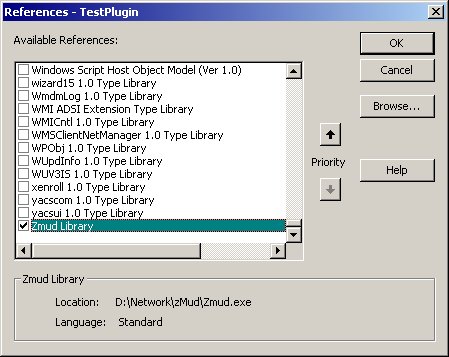
Now that we have the project created we need to hook it up to the zMUD
interface by adding a reference to the zMUD type library which is contained in
the zMUD executable. Select "References..." from the Project
menu and scroll the list all the way to the bottom. As long as zMUD is
installed on your computer you will see "Zmud Library" near the
bottom. Click the checkbox next to the library to select it and click on
the OK button.

At this point Visual Basic knows about the zMUD type library and the
interfaces that it contains and we can start to hook up the code - double click
on TestObject in the Project window and the code window for that class will
open. At this point the class should be empty (except for a possible
"Option Explicit" line depending on how you have the Visual Basic
options set) and you can start to add code.
First we need to tell Visual Basic that this class is going to implement the
IzMUDPlugin interface by adding the following line:
Implements IzMUDPlugin
At this point the Object list at the top of the TestObject code window should
have IzMUDPlugin in the list and the Procedure list should have all of the
procedures in that interface. This would be a good point to save your work
before we start to add code to the project so that it will compile and
run. Click on the Save button on the toolbar and fill in the names of the
files as Visual Basic asks for them - I called my class and project
TestObject.cls and TestPlugin.vbp respectively.
Note that if you try to compile at this point Visual Basic will complain -
this is because you've told it that the TestObject implements an Interface but
you have not written any code for that Interface - we'll do that in the next
section.
Implementing your Plugin
Now that we have the project setup it is easy to add code into it. The
first thing you need to do is provide a declaration of each method in the
IzMUDPlugin interface - these declarations do not need to do anything, but
Visual Basic will not compile the project until you have done this.
Select IzMUDPlugin from the Object list in the TestObject code window and
select each method from the Procedure list - Visual Basic will create empty
procedures each time you select a procedure that does not have a
definition. The most important definition that we need to write code for
is the Register method so that zMUD has basic information about your
plugin. The skeleton code for this procedure looks like:
Private Sub IzMUDPlugin_Register(Name As String, Company As String, Regcode As String, Description As String, Version As String, HelpFile As String, LoadDef As Boolean)

End Sub
A sample implementation might look like:
Private Sub IzMUDPlugin_Register(Name As String, Company As String, Regcode As String, Description As String, Version As String, HelpFile As String, LoadDef As Boolean)
     Name = "Test Plugin"
     Company = "Zor Software"
     RegCode = "123456789012"
     Description = "This is a test plugin that does not do anything"
     HelpFile = ""
     LoadDef = True
End Function
Compile your plugin using the "Make TestPlugin.dll" command in the
File menu. If you followed this tutorial correctly the code should compile
with no errors. You can now follow the instructions in the
"Installing Your Plugin" section of the Zuggsoft document to load your
plugin into zMUD.
That's it! Now you know how to create a zMUD Plugin using Visual Basic.
Conclusion
Right now, COM-based plugins have a similar interface to the older API-based
plugins. So, why should you bother with the new COM stuff? Well, the
answer is simple: the API is frozen...the COM interface is under active
development. Eventually, you'll be able to do a lot more to customize zMUD
using a COM-based plugin. In addition, as mentioned before, you can create
a COM-based plugin in both a DLL file, and a normal EXE file, which allows more
flexibility. Also, more development languages (such as Visual Basic) allow
you to create OLE Automation servers in an EXE file, while they do not create
DLL files.
The COM-based plugin framework for zMUD is still under active
development. Ideas and suggestions are always welcome. Please post
your ideas to the Developer's Forum on www.zuggsoft.com
and the plugin framework will get better and better due to your feedback.
