This document provides a step-by-step tutorial on creating a simple Zeus application. The application developed is a simple web browser that uses the Web Browser ActiveX component that is built-into Windows.
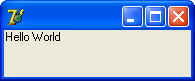
It is traditional to demonstrate a new application development tool by first creating a program to display the text "Hello World" to the user. In Zeus, this couldn't be easier! Using any text editor, such as Notepad, create a text file with the contents:
<label>Hello World</label>
and save this to the file "hello.zml". Now, double-click this hello.zml file in Windows to run it.
That's all there is to it! Compare this to other programming languages. Notice that the Window is created for you. You do not need to mess with the Windows API to create a window. Nor do you need to use something like Visual Basic or Visual Studio to create a window or form interactively. In Zeus you just specify the "components" that you want to display in your ZML file. In this case, we create a simple <LABEL> component which displays static text.
In the very simple example above, we let Zeus do a lot of work behind the scenes. We let it create a main window for us and just used all of the defaults. In fact, the file we created above isn't even really a real XML file. Zeus is designed to work with the XML file standard developed for the Internet. While Zeus is very forgiving about it's ZML file, in order to create a real application, we should really follow the XML format properly.
So, let's start again and develop a real application this time...
A ZML file is a XML format text file with a special file extension of .zml which tells Windows to load the Zeus Core engine when you double-click it. You can create and edit ZML files using any text editor or any program that supports standard XML files. By using the XML standard, a wide range of 3rd party tools are available to assist your application development. Eventually, Zugg Software plans to release the Zeus Development Environment, which will be a visual application development environment similar to Microsoft's Visual Studio, or Borland's Delphi. But until that is released, you are stuck with editing raw XML files using a text editor.
So, for our tutorial, we will just use Notepad. Open Notepad to start creating your ZML file.
This document will not attempt to teach you everything you will ever need to know about XML. There are many good books available online and at your local bookstore on XML files.
The main thing you need to know about XML for Zeus application development is that it is a "markup" language that describes data. The HTML language used for web pages is an example of a "markup language" that many people are familiar with. But XML is not the same as HTML, even though it shares many features.
XML documents consist of "tags". A tag is contained within <> characters. For example, <BUTTON> would be an XML tag. Each element in XML consists of a "tag", optionally followed by text data and then a closing tag. A closing tag has the form </tagname> where "tagname" is the name of the tag. For example, </BUTTON> would be the closing tag for the <BUTTON> tag.
If there is no text data for a tag, you can omit the closing tag by ending the original tag with /> instead of just >. For example, <BUTTON/> is an example of a "data-less" tag. This tag doesn't have any text data and doesn't need a closing tag.
Each tag can also contain attributes, or properties. These are listed before the ending > symbol in the format of Attribute='Value'. For example, the following is a valid XML element:
<BUTTON Caption='test' width='90' height='26'/>
The above example is a data-less tag again. A valid tag with text data might look like this:
<BUTTON Caption='test'>msgbox "Hello world"</BUTTON>
Is this case, the button has text data: msgbox "Hello world". Let's not worry about how the text data is used just yet. We'll come to that when we talk about scripting later. In general, just keep in mind that each XML element has a tag with optional attributes and optional text data and a closing tag.
Tags can be nested. In other words, within the "text data" portion of a tag, you can have other tags. Here is an example:
<PANEL>
  <BUTTON Caption='Button 1'/>
  <BUTTON Caption='Button 2'/>
</PANEL>
In this example, the <PANEL> tag contains two <BUTTON> tags. Each of the <BUTTON> tags has an attribute called "Caption".
In XML, the tag names and attribute names can be anything. The tags used in Zeus are described in the Zeus documentation and we'll see some examples later in this document. As new objects and features are added to Zeus, new tags and attributes are recognized. Any unrecognized tag or attribute is ignored by Zeus.
In the XML world, the DTD file is the document definition. This file can contain rules to describe what tags are allowed and what attributes are allowed. A full DTD for Zeus application ZML files will be posted to the main web site at some point. While a DTD file is needed to "validate" an application, it is not needed by Zeus to execute an application.
However, one part of the DTD is very useful for the application developer. The DTD can contain items called "Entities". Entities are macros or string-replacement values. For example, you might want to store the name of your company in an Entity so that you can refer to it later in your application. By defining an entity, your text exists in one place (the DTD) and is referred to later in your application by a link.
It is common to define the name of your application, it's version, and the author's name or company as Entities in the DTD file. Fortunately, you can embed a DTD at the very beginning of your XML or ZML file.
So, let's start typing in Notepad. Whenever you see a yellow box, it shows you the contents of your Notepad file so far. The new lines that you should enter are highlighted in blue. So, enter the following blue lines to start your ZML file:
<?xml version='1.0' encoding='ISO-8859-1' ?>
<!DOCTYPE zeus [
  <!ENTITY AppTitle "Zeus Demonstration Program">
  <!ENTITY AppAuthor "Zugg Software">
  <!ENTITY AppVersion "1.0">
  <!ENTITY AppURL "http://www.zuggsoft.com/">
]>
|
Let's examine each line that we just entered. The first line starts with <?xml> and is the header that tells everyone that the following is an xml file that adheres to the version 1.0 of the XML standard. Don't worry too much about what everything in the first line means. Just type is exactly like it is shown. You can run Zeus applications without this line, but some other 3rd party XML readers will not like your ZML file if it doesn't have this header line.
The second line starts the embedded DTD in your application file. The <!DOCTYPE tag is a special tag for tells everyone the Document Definition (DTD) structure for the rest of the file. The first argument of this tag is the "name" of the "global tag" that we will see later that encloses the entire application. Zeus doesn't actually care what the global tag is called, but stick with "zeus" as a standard so that other applications know what we are doing.
There are ways to specify a remote DTD file on a remote web server. But all we want to do here is have a local DTD section so that we can define some Entities to use later in the application. In this example, you'll see that we define four entities: AppTitle, AppAuthor, AppVersion, and AppURL. Just follow the syntax shown above if you want to add more. The names of your entiries don't really matter. Zeus doesn't care what you call them as long as you use the same names when you refer to them later in your application.
The only reason you might want to keep these same standard Entity names is that Zeus provides some template files for things like About boxes and Splash screens that use these entity names.
Once we are done with our Entity definitions, we are ready for the main application. As we specified in the DTD information above, the main "tag" for our application is "zeus". So, let's add that tag to our file next (remember, add the lines highlighted in blue):
<?xml version='1.0' encoding='ISO-8859-1' ?>
<!DOCTYPE zeus [
  <!ENTITY AppTitle "Zeus Demonstration Program">
  <!ENTITY AppAuthor "Zugg Software">
  <!ENTITY AppVersion "1.0">
  <!ENTITY AppURL "http://www.zuggsoft.com/">
]>
<zeus>
|
Now, a Zeus application consists of several sections. The first section starts with the <head> tag and is the header for the application. The header contains global information for the application, and can also contain an optional splash screen which is displayed while the application is loaded. After the <head> section come the <window> sections which define the various windows used by the application. We'll discuss <window> sections later. For now, go ahead and open the <head> section with the tag:
<?xml version='1.0' encoding='ISO-8859-1' ?>
<!DOCTYPE zeus [
  <!ENTITY AppTitle "Zeus Demonstration Program">
  <!ENTITY AppAuthor "Zugg Software">
  <!ENTITY AppVersion "1.0">
  <!ENTITY AppURL "http://www.zuggsoft.com/">
]>
<zeus>
  <head>
|
OK, now we are ready to define our application header. Everything within the <head> tag will define global elements for your entire application. Typically these are: Actions, Toolbars, and Menus. Let's look at each of these in turn:
An action is essentially a named script. Somewhat like a subroutine or procedure in another programming language. However, in Zeus, Actions are global and have some special and useful properties. You can always define local procedures and subroutines in your scripts later. Actions are scripts that are associated with buttons, menu commands, toolbars, etc.
Each action must have a unique name. This is the name you will use to assign the action to a button or menu item later. Zeus also contains many "predefined" actions, which always start with an underscore (_) character. So, never start your own action names with an underscore. See the full Zeus documentation for a list of all pre-defined actions.
Let's think about a toolbar button for a minute. When you click a toolbar button, it performs an action. For example, the "Bold" button on a toolbar might make the selected text into a Bold font. This same action might also be listed in a Menu. For example, under a "Format" menu you might have a "Bold" command which does the same thing as the Bold button on the toolbar.
Actions are a way to unite toolbar buttons and menu commands to avoid duplication and provide some nice synchronization. For example, if the toolbar Bold button is "selected" to show that the current text is Bold, then shouldn't the Bold menu command also have a checkmark next to it? If the toolbar Bold button is disabled for some reason, shouldn't the Bold menu command also be disabled? This is where actions come in.
So, in addition to a name, we need some other properties or "attributes" to define an action so it can be used by both toolbar buttons and menu commands. First, we need a "caption" which is the text name displayed to the end-user for the menu command or button. This text name might not always be displayed on the toolbar unless the user has chosen to show text on the toolbar. But the text Caption will probably always be displayed in the menu.
Here are all of the properties of an Action:
Instead of using a Script attribute in the <action> tag, you can put the script for the action in the "Text" portion of the tag. This makes it easier to assign multiline scripts to actions.
Let's add some actions to our web browser. Don't worry about the Script sections right now, just look at the overall syntax and compare each attribute to the description given above to understand each one.
<?xml version='1.0' encoding='ISO-8859-1' ?>
<!DOCTYPE zeus [
  <!ENTITY AppTitle "Zeus Demonstration Program">
  <!ENTITY AppAuthor "Zugg Software">
  <!ENTITY AppVersion "1.0">
  <!ENTITY AppURL "http://www.zuggsoft.com/">
]>
<zeus>
  <head>
    <action name='Navigate' caption='Go' image='world' script='Browser.Navigate( URL.Text)'/>
    <action name='BrowseBack' caption='Back' image='arrowleft' script='Browser.GoBack'/>
    <action name='BrowseForward' caption='Forward' image='arrowright' script='Browser.GoForward'/>
    <action name='BrowseHome' caption='Home' image='home' script='Browser.GoHome'/>
    <action name='BrowseStop' image='stop' script='Browser.Stop'/>
    <action name='BrowseReload' image='redo' script='Browser.Refresh'/>
|
Notice that each action has a unique name. For the images, we just specify the name of the image we want to display for the toolbar button or menu command. Zeus contains hundreds of built-in images. For a full list of the built-in image names, consult the full Zeus documentation. Instead of using a built-in name, you can also specify a filename. The filename can refer to any BMP, GIF, JPG, or PNG file that you want. However, using a built-in name is nice because you get a professionally designed 256 color image that has a mouse-over "hot" image, along with a disabled gray image without having to do all the work to design your own. And even when you use a built-in image, the end-user can still override it with an image file on disk. Simply create an "/icons" subdirectory in your application directory and place a BMP, GIF, JPG, or PNG file with the same name in that file. For example, in the above list of actions, the "Navigate" action has an image name of "World". So, by default, the built-in "world" images are displayed. However, if the user put a graphic image called "world.gif" in the "/icons" subdirectory of the application, then the user's image will be loaded instead of the built-in image. This is a quick and easy way for the end user to customize your application. The only restriction is that the images MUST be 16x16 pixels in size. Any different size will not get loaded. See the main Zeus documentation for more information on images and how to specify your own "hot" and "disabled" images.
Now that we have defined some global actions, it's easy to add them to toolbars and menus. Let's look at toolbars first. Remember that we are still in the <head> header section and are defining global items for our applications. So what we are going to do is list the different toolbars that are available for our application. By defining the toolbars in the header we are giving the end user an easy single place to look for making any changes. In addition, future versions of Zeus will provide built-in mechanisms to allow the user to interactively edit and modify any toolbars listed in the <head> section. You can always put window-specific toolbars hardcoded in the <window> sections later, but they cannot be modified by the user interactively...only if they hand edit your XML text file.
In Zeus, your main Menu is also a toolbar. So, let's first just look at your main toolbar that has buttons. Then we'll get to menus in the next section. Here is our global toolbar:
<?xml version='1.0' encoding='ISO-8859-1' ?>
<!DOCTYPE zeus [
  <!ENTITY AppTitle "Zeus Demonstration Program">
  <!ENTITY AppAuthor "Zugg Software">
  <!ENTITY AppVersion "1.0">
  <!ENTITY AppURL "http://www.zuggsoft.com/">
]>
<zeus>
  <head>
    <action name='Navigate' caption='Go' image='world' script='Browser.Navigate( URL.Text)'/>
    <action name='BrowseBack' caption='Back' image='arrowleft' script='Browser.GoBack'/>
    <action name='BrowseForward' caption='Forward' image='arrowright' script='Browser.GoForward'/>
    <action name='BrowseHome' caption='Home' image='home' script='Browser.GoHome'/>
    <action name='BrowseStop' image='stop' script='Browser.Stop'/>
    <action name='BrowseReload' image='redo' script='Browser.Refresh'/>
    <toolbar name='maintoolbar'>
      <item action='BrowseBack'/>
      <item action='BrowseForward'/>
      <item action='BrowseStop'/>
      <item action='BrowseReload'/>
      <item action='BrowseHome'/>
    </toolbar>
|
Notice that the toolbar has a unique Name so we can refer to it later in our application. Then, within the <toolbar> tag we have multiple <item> tags specifying each toolbar button. You might think the tags should have been called <toolbarbutton> instead of <item>, but as you will see in the main Zeus documentation, <item> tags can do much more than simple buttons.
But in our simple toolbar case, each "item" on the toolbar simply refers to one of the Actions that we previously defined. That's all you need to do. The image, text caption and everything thing else needed for each toolbar button will be taken from the Action definition.
But you can override the Action definitions any time you want. The <item> tag accepts all of the same attributes as the <action> tag itself. So, if you wanted, you could change the caption, or the image, or even the script by overriding it with attributes in the <item> tag for your toolbar. Since this can result in an inconsistent user interface, it is not recommended, but sometimes this kind of power is needed.
Here is how this toolbar is going to look to the user: ![]()
Menus can be used in a variety of ways. In addition to the normal "main menu" along the top of an application, you can also have "right-click" popup menus when you right-click the mouse on something in your application. You can also assign menus to buttons to give them pulldown menus when you click on them.
In Zeus, the <menu> tag is used to define a menu. You can use the <menu> tag within the <head> tag to define global menus, or you can embed <menu> tags within a <toolbar> definition just like the <item> tag. Let's do a combination of both. First, let's define one of the most common menus that you'll find in applications...the "edit" menu:
<?xml version='1.0' encoding='ISO-8859-1' ?>
<!DOCTYPE zeus [
  <!ENTITY AppTitle "Zeus Demonstration Program">
  <!ENTITY AppAuthor "Zugg Software">
  <!ENTITY AppVersion "1.0">
  <!ENTITY AppURL "http://www.zuggsoft.com/">
]>
<zeus>
  <head>
    <action name='Navigate' caption='Go' image='world' script='Browser.Navigate( URL.Text)'/>
    <action name='BrowseBack' caption='Back' image='arrowleft' script='Browser.GoBack'/>
    <action name='BrowseForward' caption='Forward' image='arrowright' script='Browser.GoForward'/>
    <action name='BrowseHome' caption='Home' image='home' script='Browser.GoHome'/>
    <action name='BrowseStop' image='stop' script='Browser.Stop'/>
    <action name='BrowseReload' image='redo' script='Browser.Refresh'/>
    <toolbar name='maintoolbar'>
      <item action='BrowseBack'/>
      <item action='BrowseForward'/>
      <item action='BrowseStop'/>
      <item action='BrowseReload'/>
      <item action='BrowseHome'/>
    </toolbar>
    <menu name='EditMenu'>
      <item action='_EditCut'/>
      <item action='_EditCopy'/>
      <item action='_EditPaste'/>
    </menu>
|
Notice that this is much like the <toolbar> tag used previously. In this case, however, we are using three pre-defined Actions instead of actions we defined ourselves. These three actions represent the standard "Cut", "Copy", and "Paste" menu items. Each of these actions already has a caption, image, shortcut, script, and hint already defined for you. It makes creating applications even easier!
Now, let's define our top-level main menu:
<?xml version='1.0' encoding='ISO-8859-1' ?>
<!DOCTYPE zeus [
<!ENTITY AppTitle "Zeus Demonstration Program">
<!ENTITY AppAuthor "Zugg Software">
<!ENTITY AppVersion "1.0">
<!ENTITY AppURL "http://www.zuggsoft.com/">
]>
<zeus>
<head>
<action name='Navigate' caption='Go' image='world' script='Browser.Navigate( URL.Text)'/>
<action name='BrowseBack' caption='Back' image='arrowleft' script='Browser.GoBack'/>
<action name='BrowseForward' caption='Forward' image='arrowright' script='Browser.GoForward'/>
<action name='BrowseHome' caption='Home' image='home' script='Browser.GoHome'/>
<action name='BrowseStop' image='stop' script='Browser.Stop'/>
<action name='BrowseReload' image='redo' script='Browser.Refresh'/>
<toolbar name='maintoolbar'>
<item action='BrowseBack'/>
<item action='BrowseForward'/>
<item action='BrowseStop'/>
<item action='BrowseReload'/>
<item action='BrowseHome'/>
</toolbar>
<menu name='EditMenu'>
<item action='_EditCut'/>
<item action='_EditCopy'/>
<item action='_EditPaste'/>
</menu>
<toolbar name='mainmenu'>
<menu caption='&File'>
<item action='_FileExit'/>
</menu>
<menu caption='&Edit' submenu='EditMenu'/>
<menu caption='&View'>
<item action='BrowseBack'/>
<item action='BrowseForward'/>
<item action='BrowseHome'/>
<item action='Navigate'/>
</menu>
<menu caption='&Help'>
<item caption='&About' script='core.execwindow( "About")'/>
</menu>
</toolbar>
|
Wow, that's a lot to type isn't it. Let's take it a step at a time to help you understand what it all does. Once you understand each element you will see that it's really pretty easy. And this creates a complete main menu with a fully functional user interface and a lot of power hidden behind the scenes.
OK, starting at the top we see the normal <toolbar> tag to start our toolbar definition. Remember that the Main Menu is a toolbar. It can be dragged by the user to different docking positions on the screen, or undocked as a floating toolbar.
Instead of an <item> tag, we make a menu item using the <menu> tag. In this case we create the global "File" menu that every Windows application has. Within the <menu> tag there is a single item that calls the pre-defined action called _FileExit which exits the application when selected by the user. Simple enough.
The & syntax is used to represent the & "ampersand" character within an XML file. The syntax &xxx; is used to specify an "entity" named xxx. And entity is like a macro symbol. You define the entity in your DTD section (like the AppTitle entity). Because the & is used to reference "entities", XML defines a standard entity named & for the & symbol itself. Other pre-defined entities like > and < for the > and < characters are also useful.
Windows uses the & in a caption to underline the next letter. This is how the "F" in the "File" menu gets underlined. Not only does Windows underline this character, but it then sets up the Alt-F key as a shortcut for this menu. So, whenever you want to set up an Alt-key shortcut for a menu item, put & in front of the character in the caption you want underlined.
After the "File" menu comes the standard "Edit" menu. We previously defined a "EditMenu" menu structure above, so we use it here by specifying the "submenu" attribute. This allows us to reuse a common menu structure in many different places in the applications. For example, we might use the EditMenu structure in various right-click popup menus. We still specify the caption for the "Edit" menu, but the submenu items come from our EditMenu definition.
After the "Edit" menu comes the "View" menu. Here we list items much like we did on the main toolbar. Instead of toolbar buttons, these will be menu commands since they are contained within the <menu> tag. But they will have the same images and captions as the items on the main toolbar.
Finally, after the "View" menu we have the normal "Help" menu. In this example we only have a single <item> for the About box for the application. We could have defined an "About" action to handle this, but since this action is just used once in this menu, we just hard-code the script right here. The script is
core.execwindow( "About")
which you really don't need to understand at this point. But for those expert programmers reading this, you can see that this script calls a Zeus Core function called "execwindow" which happens to create a popup window, display it as a modal form, wait for the user to close the window and then continues. The argument for the execwindow function is the name of a <window> section that we'll see later in the ZML file. Zeus provides many functions like this for performing various actions. It is the rich set of core objects and functions that makes Zeus a unique and powerful application development system. Regardless of whether you write your scripts in VBScript (like we are using in this document), or in Javascript, or in Perl, you can use the core functions and objects in any language.
Here is how this menu will look to the user: ![]()
Before we finish the <head> section, let's go back and define a customized splash screen for our application. I've put this out of order because I wanted to introduce the common tags like <menu> and <toolbar> before we got into more complicated user interface issues. However, even though we have already edited our ZML file, the Splash screen definition MUST go at the beginning of the <head> section.
So, in Notepad, scroll back up to the top and put your cursor just after the <head> tag and before the first <toolbar> tag. This is where we need to insert our splash screen tag:
<?xml version='1.0' encoding='ISO-8859-1' ?> <!DOCTYPE zeus [ <!ENTITY AppTitle "Zeus Demonstration Program"> <!ENTITY AppAuthor "Zugg Software"> <!ENTITY AppVersion "1.0"> <!ENTITY AppURL "http://www.zuggsoft.com/"> ]> <zeus> <head> <splash> <image image='emobius.gif' deltaleft='8' deltatop='8' width='64' height='64'/> <label align='Client' bevelouter='Lowered' autoleft='true' deltaleft='8' width='-8' height='-8'> <![CDATA[<b>eMobius</b><br><br> eMail with a <i>twist</i><br><br> Version &AppVersion;<br><br> by &AppAuthor;]]></label> </splash> <action name='Navigate' caption='Go' image='world' script='Browser.Navigate( URL.Text)'/> <action name='BrowseBack' caption='Back' image='arrowleft' script='Browser.GoBack'/> <action name='BrowseForward' caption='Forward' image='arrowright' script='Browser.GoForward'/> <action name='BrowseHome' caption='Home' image='home' script='Browser.GoHome'/> <action name='BrowseStop' image='stop' script='Browser.Stop'/> <action name='BrowseReload' image='redo' script='Browser.Refresh'/> <toolbar name='maintoolbar'> <item action='BrowseBack'/> <item action='BrowseForward'/> <item action='BrowseStop'/> <item action='BrowseReload'/> <item action='BrowseHome'/> </toolbar> <menu name='EditMenu'> <item action='_EditCut'/> <item action='_EditCopy'/> <item action='_EditPaste'/> </menu> <toolbar name='mainmenu'> <menu caption='&File'> <item action='_FileExit'/> </menu> <menu caption='&Edit' submenu='EditMenu'/> <menu caption='&View'> <item action='BrowseBack'/> <item action='BrowseForward'/> <item action='BrowseHome'/> <item action='Navigate'/> </menu> <menu caption='&Help'> <item caption='&About' script='core.execwindow( "About")'/> </menu> </toolbar> |
Once again, this looks more complicated than it really is. First, look for the <tag> elements. You'll see that we start with <splash> to define a splash screen, and end in </splash>. Within this we have two elements: the <image> element and the <label> element. That means our splash screen is just going to have two things on it: an image and some static text.
The image name defines the name of the image to display. Again, this is either a built-in image, or the name of a file. All of the built-in images are only 16x16 pixels in size, and we want something bigger on our splash screen. So, we tell it to load the "emobius.gif" image. This is a 64x64 pixel image, and is actually an "animated" GIF image. The <image> tag in Zeus is very powerful and can display any BMP, GIF, animated GIF, JPG, or PNG file. This is more flexibility than most any expensive development suite can provide!
After specifying the name of the image file, we add some attributes to customize the position of this image. Normally, the image would have been placed at the 0,0 upper-left corner of our popup splash window. But we want to leave a bit of a margin between the image and the edge of the screen, so we use the attributes called "deltaleft" and "deltatop" to offset the image 8 pixels from the left and top edge of the window. Finally we specify the size of the image and use the same values as the raw image. If we used larger values here, the graphical file would be centered within the larger image box.
Once the image is defined, we next have some <label> text. The <label> tag creates a static text label displayed on the popup window. Unlike other languages that just allow you to specify plain text labels, Zeus allows you to use a simple subset of HTML within it's <label> tag. That provides for some powerful formatting ability (including the ability to embed active links within your text labels). But it comes with a cost of a bit more XML complexity.
Before we get to the XML issue, let's look at the attributes for the <label> tag. First, we have an "align" attribute. The "align" attribute is a common attribute of most every visual component in Zeus. It allows a control to fill a given space or align itself to the edge of a space. In this case we use the "client" alignment will tells Zeus to use all of the rest of the space on this form for this control. Now, the <image> we used is already occupying the leftmost part of the window. Using align='client' would normally cause the text label to overlay on top of the image. We don't want this...we want the text label to occupy the window just to the right of the image. So, we use the "autoleft" attribute. The "autoleft" attribute tells Zeus to place the left edge of this component next to the previous component (the <image> in this case). So instead of taking up the entire window, the text now takes up everything to the right of the image.
Now, again, we don't want the text to be right against the edge of the window. We want to add a bit of space as a border. So we again use the "deltaleft" attribute to add 8 pixels of space on the left side of the text between the text and the image. However, instead of using "deltatop", "deltaright", and "deltabottom", we simply modify the width and height of the text control. Normally the "width" and "height" attributes specify the absolute number of pixels for the component. But when you use a negative value, the width or height is adjusted in a relative manner. Here we adjust the width by -8 to form a border on the right, and adjust the height by -8 to form a border on the bottom.
What happened to the top? Why didn't we need "deltatop"? Well, part of the "autoleft" attribute is to align the top of our control with the top of the previous control. Since the image already had a border along the top, our text component already had a border on top as well. AutoLeft is intended to form a horizontal row of components, such as a toolbar, where the top of each control is aligned. AutoTop can be used to form a vertical column of controls where the left side of each control is aligned.
Oh yes, the "bevelouter" puts a nice bevel border around the entire text block that looks like it is lowered into the window. This is just another pretty feature of many Zeus controls, including simple text labels.
Now that we are done positioning our label just right, it's time to insert the text we actually want to display. As I mentioned, text labels can contain simple HTML tags such as <B> for bold text, or <I> for italic text. For a complete list of HTML supported by simple labels, consult the full Zeus documentation. What we really want to display in the splash screen is something like this:
| eMobius
eMail with a twist Version 1.0 by Zugg Software |
We want the name of the application to be in "bold" and the word "twist" to be in italic. And we want those extra line breaks. Well, in HTML if you want a line break, you use the <BR> tag. If you want bold you use <B> and </B>, and italic is <I> and </I>. So, the HTML version of our text is:
<b>eMobius</b><br><br>
eMail with a <i>twist</i><br><br>
Version 1.0<br><br>
by Zugg Software
OK, that's not too bad. But why hard-code the version number and author when we already defined those nifty Entities to contain those values. So, let's use the entities. Now our text becomes:
<b>eMobius</b><br><br>
eMail with a <i>twist</i><br><br>
Version &AppVersion;<br><br>
by &AppAuthor;
Just remember that an entity starts with a & and ends with a ; in XML. OK, now we come to the tricky part. Remember that < and > are reserved characters in XML. Well geez, what a pain. We could go into our text and replace every < with < and every > with >, but that would be a lot of work and would look like a real mess. XML has a way around this. For specifying large blocks of text that you want XML to ignore, you create a section called CDATA (stands for Character Data). CDATA is useful for embedding HTML text like we are doing here, or for long scripts that might have special characters in it.
To specify a CDATA section, you start it with <![CDATA[ and end it with ]]> Yes, this seems really obscure and hard to remember. But it's supposed to be. They needed to come up with a series of text that would not normally be used in regular data. They figured that <
We are done with the <head> section now, so make sure you add the </head> tag to close it. As mentioned above, after the heading section comes <window> sections. Each window section specifies the layout and scripting for a particular user-interface window within your application.
The first <window> section defines the main window of your application that is automatically created for you after the application is loaded. Any other windows that you defined must be loaded within the scripts of your application using the core.execwindow or core.makewindow functions.
Make a window is a lot like making the splash screen. In fact, the splash screen is a special version of a window (a splash screen is more limited in what it can contain since it is displayed before the rest of your application is really loaded). Here is the first line of our main <window> section:
<?xml version='1.0' encoding='ISO-8859-1' ?>
<!DOCTYPE zeus [
<!ENTITY AppTitle "Zeus Demonstration Program">
<!ENTITY AppAuthor "Zugg Software">
<!ENTITY AppVersion "1.0">
<!ENTITY AppURL "http://www.zuggsoft.com/">
]>
<zeus>
<head>
<splash>
<image image='emobius.gif' deltaleft='8' deltatop='8' width='64' height='64'/>
<label align='Client' bevelouter='Lowered' autoleft='true' deltaleft='8' width='-8' height='-8'>
<![CDATA[<b>eMobius</b><br><br>
eMail with a <i>twist</i><br><br>
Version &AppVersion;<br><br>
by &AppAuthor;]]></label>
</splash>
<action name='Navigate' caption='Go' image='world' script='Browser.Navigate( URL.Text)'/>
<action name='BrowseBack' caption='Back' image='arrowleft' script='Browser.GoBack'/>
<action name='BrowseForward' caption='Forward' image='arrowright' script='Browser.GoForward'/>
<action name='BrowseHome' caption='Home' image='home' script='Browser.GoHome'/>
<action name='BrowseStop' image='stop' script='Browser.Stop'/>
<action name='BrowseReload' image='redo' script='Browser.Refresh'/>
<toolbar name='maintoolbar'>
<item action='BrowseBack'/>
<item action='BrowseForward'/>
<item action='BrowseStop'/>
<item action='BrowseReload'/>
<item action='BrowseHome'/>
</toolbar>
<menu name='EditMenu'>
<item action='_EditCut'/>
<item action='_EditCopy'/>
<item action='_EditPaste'/>
</menu>
<toolbar name='mainmenu'>
<menu caption='&File'>
<item action='_FileExit'/>
</menu>
<menu caption='&Edit' submenu='EditMenu'/>
<menu caption='&View'>
<item action='BrowseBack'/>
<item action='BrowseForward'/>
<item action='BrowseHome'/>
<item action='Navigate'/>
</menu>
<menu caption='&Help'>
<item caption='&About' script='core.execwindow( "About")'/>
</menu>
</toolbar>
</head>
<window name='main' caption='Zeus Demo' width="640" height="480">
|
This is simple...we give the window a name, a caption, and a size. We can also specify a left and top position if we want. For most windows, the initial size and position are only used the first time an application is displayed. Once the user has moved the window or resized it, it will get displayed using the saved user's settings rather than the settings given in your ZML file.
Just like a splash screen, a window contains various user-interface components. For our main window, we first want to have our main menu and our toolbar that we previously defined. But instead of placing them directly on the window (we could if we wanted), let's put them into a <dock>. A <dock> is a container on an edge of your window that the user can drag toolbars into, rearrange toolbars, etc.
To save some space on this page, I'm going to put a "..." in place of the entire <head> section that we have already typed into our file. So here is our menu and toolbar within the <dock>:
<?xml version='1.0' encoding='ISO-8859-1' ?>
<!DOCTYPE zeus [
  <!ENTITY AppTitle "Zeus Demonstration Program">
  <!ENTITY AppAuthor "Zugg Software">
  <!ENTITY AppVersion "1.0">
  <!ENTITY AppURL "http://www.zuggsoft.com/">
]>
<zeus>
  <head>
    ...
  </head>
  <window name='main' caption='Zeus Demo' width="640" height="480">
    <dock position='top'>
      <includebar name='mainmenu'/>
      <includebar name='maintoolbar'/>
    </dock>
|
We tell the <dock> to position itself at the top of our window, and then we use the <includebar> tag to include a reference to the previously defined mainmenu and maintoolbar. They will be placed next to each other in the dock. This isn't how most applications work. Most applications have the toolbar on the next line below the menu. You can do that in Zeus as well by adding the attribute full='true' to the mainmenu to force it to use the full width of the dock. In fact, you can override any attribute of the toolbar here with the <includebar> tag if you'd like. But we won't use the "full" attribute because we think it's a waste of valuable space to put the toolbar on it's own line below the menu. Just because normal Window menus can't have a toolbar on the same line doesn't mean you are restricted to that in Zeus!
Here is what the dock at the top of the window will look like for the user:
![]()
OK, for our simple web browser, we are going to put a text input box along the top with a "Go" button next to it, with the main browser window below it. To group the text input box and button into it's own area, we will use a <panel> tag. A <panel> is a rectangular region, much like a window itself. Within a <panel> you can align controls independently of the stuff outside the panel. This provides a powerful way to construct a complex user interface. Remember that you rarely want to specify the exact size of a control (unless it is an image with a fixed pixel size). Because the user can load their own "theme" for your application, you never know what size font they are using, or what size their buttons are, etc. If you find yourself specifying the size of controls, you are probably doing it wrong. Try to use the align attribute and the other attributes discussed in the splash screen section to control how your components are sized and placed.
Now that I have set up this rule, I'm immediately going to break it. We do need to specify how much of the window we want to use for our text input box and button. There IS an "autosize" attribute for a panel that will adjust the size of the panel based upon the components inside, but this would look bad for what we want to do. Typically a button is going to be taller than a text input box. So, with autosize, the panel will be sized for the tallest element, which is the button, and then the text input box will have extra space below it that will look bad. What we want to do instead of specify our own height of the panel and force the button to fix within it. It's true that if the user loaded a theme with a huge button font size, our application might not look right since the button in the panel might be too small to show the large font caption. But, that's the tradeoff we are going to use in this simple example.
So, let's look at our panel:
<?xml version='1.0' encoding='ISO-8859-1' ?>
<!DOCTYPE zeus [
  <!ENTITY AppTitle "Zeus Demonstration Program">
  <!ENTITY AppAuthor "Zugg Software">
  <!ENTITY AppVersion "1.0">
  <!ENTITY AppURL "http://www.zuggsoft.com/">
]>
<zeus>
  <head>
    ...
  </head>
  <window name='main' caption='Zeus Demo' width="640" height="480">
    <dock position='top'>
      <includebar name='mainmenu'/>
      <includebar name='maintoolbar'/>
    </dock>
    <panel align='top' height='22'>
      <button action='Navigate' align='right'/>
      <edit name='URL' caption='URL:' align='client' deltaleft='36'>&AppURL;</edit>
    </panel>
|
We tell the panel to align itself to the top of the window with a height of 22 pixels. This will put the panel (which is invisible itself), just below our toolbar dock. This panel contains two elements: a <button> and a <edit> control.
The <button> tag points to our previously defined "Navigate" action. So, this button will do the same thing as the Navigate menu item in the View menu. We give it an align of "right" to force the button to the right side of our panel.
Next we have the <edit> component. This is the tag for a single-line text input field. We give it a name of "URL" so we can use it in scripting later. Then we also give it a caption of "URL". Unlike some programming languages, various controls like edit boxes can have attached text labels. Just like with <label> these labels can contain HTML if we want. In this case, a simple "URL:" string is fine. Now we use align='client' to tell Zeus to make the edit box take up all of the rest of the space in the panel. However, since this makes the text entry portion take up the entire space, there is no room to display our label, so we use the "deltaleft" attribute to move the start of the edit box 36 pixels to make room for the URL: caption.
Finally, you'll see that the text data for the <edit> tag uses the Entity that we previously defined for the URL of our application home page. We use this as the default starting value for this edit box. So, instead of an empty text box, the "http://www.zuggsoft.com/" text will be displayed in the edit box.
Here is what our panel looks like for the user:
![]()
Before we get to the main web browser control, let's add one more thing to our application. Let's put a status bar along the bottom to display various messages from our web browser. We'll also close our current <window> definition and put the closing </zeus> tag at the bottom of the application. Doing this is simple:
<?xml version='1.0' encoding='ISO-8859-1' ?>
<!DOCTYPE zeus [
  <!ENTITY AppTitle "Zeus Demonstration Program">
  <!ENTITY AppAuthor "Zugg Software">
  <!ENTITY AppVersion "1.0">
  <!ENTITY AppURL "http://www.zuggsoft.com/">
]>
<zeus>
  <head>
    ...
  </head>
  <window name='main' caption='Zeus Demo' width="640" height="480">
    <dock position='top'>
      <includebar name='mainmenu'/>
      <includebar name='maintoolbar'/>
    </dock>
    <panel align='top' height='22'>
      <button action='Navigate' align='right'/>
      <edit name='URL' caption='URL:' align='client' deltaleft='36'>&AppURL;</edit>
    </panel>
    <statusbar name='Status' align='bottom'/>
  </window>
</zeus>
|
We give the status bar a name so we can access it in a script later, and tell it to align itself to the bottom of our main window. Easy!
ActiveX controls have gotten a bad reputation. So, before you think "yuck!" and skip this section, pay attention! An ActiveX control is simply a visual component, like a button or edit box, that has been defined on your system to be used in any other application. That's it. It was originally invented by Microsoft for their Visual Basic development environment. They wanted a way for 3rd party programmers to develop nifty visual controls that anyone could use in their Visual Basic application. By itself, Visual Basic only has access to a very small number of plain controls that are built into Windows. But there are a huge number of 3rd party ActiveX controls that add all sorts of cool components to Visual Basic.
The reason ActiveX controls are so hated by people these days is that Microsoft thought it was a good idea to allow Internet Explorer to embed and display ActiveX controls within a web page. Sounds like a cool idea until you realize that the ActiveX control is running on YOUR computer and can do ANYTHING it wants to your computer. And who wants to go to a web site that can use an ActiveX control to do something to your computer! Most people turn off ActiveX support in IE to prevent this from happening. And IE will now warn you with a popup message whenever a web page tries to send you a new ActiveX control so that you can cancel it or accept it depending upon the web site you are visiting.
So, ActiveX controls are not inherently bad or unsecure. They are only bad when they are loaded or executed from an external site that you have no control over. Zeus uses ActiveX controls the way they were originally intended for Visual Basic. You can use any ActiveX control within your Zeus application. But you retain control over the object. ActiveX controls cannot be loaded or run by an external source.
It turns out that there are many ActiveX controls already installed on your system as part of Windows. One of the most powerful of these controls is Internet Explorer itself! Yes, that's right, Internet Explorer itself has been embedded into an ActiveX control that you can use in any programming language for free. It's kind of ironic that Internet Explorer can display and execute ActiveX controls, and that IE itself is an ActiveX control. So, IE could display IE within itself. Sort of weird.
The ActiveX control for Internet Explorer is commonly called the WebBrowser control, and has the specific object name on your system of "Shell.Explorer" Yes, that's right, the object is contained with the Windows "Shell" module and is called Explorer. Ever noticed that when you are browsing a file directory on your computer, the process is called "Explorer"? Yep, that's no coincidence. The file explorer being used to browse your directories is really the same as Internet Explorer. That's why no matter how hard you try, you cannot remove Internet Explorer from Windows. Windows itself needs it for core functionality. You can debate whether this is a good idea or not, but in any case, this is a powerful object you can use in your applications.
Keep in mind that when you use the Shell.Explorer object in your application, you are bringing Internet Explorer into your application with all of it's potential security holes and problems. Be sure this is really what you want. There is a lot of power available to quickly build applications with Shell.Explorer, but keep in mind the potential drawbacks.
OK, enough introduction. Let's put Internet Explorer into our application:
<?xml version='1.0' encoding='ISO-8859-1' ?>
<!DOCTYPE zeus [
  <!ENTITY AppTitle "Zeus Demonstration Program">
  <!ENTITY AppAuthor "Zugg Software">
  <!ENTITY AppVersion "1.0">
  <!ENTITY AppURL "http://www.zuggsoft.com/">
]>
<zeus>
  <head>
    ...
  </head>
  <window name='main' caption='Zeus Demo' width="640" height="480">
    <dock position='top'>
      <includebar name='mainmenu'/>
      <includebar name='maintoolbar'/>
    </dock>
    <panel align='top' height='22'>
      <button action='Navigate' align='right'/>
      <edit name='URL' caption='URL:' align='client' deltaleft='36'>&AppURL;</edit>
    </panel>
    <activex name='Browser' align='client' classname='Shell.Explorer'/>
    <statusbar name='Status' align='bottom'/>
  </window>
</zeus>
|
Yep, that's it. One line in our ZML file. You can save this file and double-click it to run it right now!
The <activex> tag is used to place ANY ActiveX control within your Zeus application. Give it a name so you can control it with a script, then we use align='client' to tell it to use up all of the rest of our window. Finally, the classname attribute specifies the Windows COM object name of the ActiveX control. This is the same name that you would use in Visual Basic or ASP scripts in the "createobject" function, or in Delphi using "CreateOleObject". But don't put any COM object name here...only use ActiveX controls. The main Zeus documentation will tell you how to use non-visual COM objects.
Here is what the application looks like just after the user clicks the Go button:

The ZML file is useful for defining the user-interface layout, but it can also contain programming scripts. There are two things we need to do to make our little web browser functional. First, we need to make the "Go" button navigate to the URL defined in our text box. Next we need to display any messages sent by the web browser to our status bar.
The script for the Go button has actually already been defined. It was done way back in our initial <action> definitions (told you we would get back to that). Remember the Navigate action:
<action name='Navigate' script='Browser.Navigate( URL.Text)' caption='&Go' image='world' hint='Go' shortcut='Ctrl-G'/>
The script for this action was:
Browser.Navigate( URL.Text)
Now, this is normal VBScript syntax for calling a COM object function. In this case, "Browser" is the name that we assigned to the Explorer ActiveX control. "URL" is the name we assigned to our text input box. So, this line of script takes the "Text" property of the "URL" control (which is whatever we type into the edit box) and sends it to the "Navigate" method of the "Browser" control.
How do you know what the names of various methods and properties of objects and ActiveX controls are? Ahh, well, that's the trick. The Zeus Development kit will have a application that lets you browse the ActiveX and COM components installed on your system and see what properties and methods they have. For components that are built into Zeus, such as the <edit> control, the full Zeus documentation will tell you about all of the method and property names.
If you look at the other Actions we defined at the beginning, you will see some of the other methods supported by the Explorer ActiveX control. If you are interested in learning more about the Shell.Explorer (WebBrowser) ActiveX control, consult the Microsoft site for documentation.
OK, that handles the page navigation. Now, what about handling messages. In addition to sending information INTO an ActiveX control via properties or methods, ActiveX controls have a way to send data BACK to us using something called Events. For example, when the Explorer control has a text message that it wants displayed on a statusbar, it sends the event called "StatusTextChange". If you look at the Microsoft documentation, you will see that this event has one argument called "Text" which is the string of text to be displayed.
In Zeus, to handle Events, you create subroutines or functions in whatever scripting language you are using with a specific name. The event handling routines always have the name NAME_ONxxxx where NAME is the name of the control sending the event (Browser in this case), and xxxx is the name of the event. So, for the status bar messages, we need to create a VBScript subroutine called Browser_OnStatusTextChange.
Now, in addition to whatever arguments are sent by the event, Zeus adds an argument at the very beginning called "Sender" which is always a COM object pointer back to the object that sent the event. So, the VBScript subroutine looks like this:
sub Browser_OnStatusTextChange( Sender, sText)
  Status.Caption = sText
end sub
Subroutines in VBScript start with "sub" and end with "end sub". The name of the routine is as we specified above. The argument list shows the first "Sender" item which is the pointer to the COM object (ActiveX control) sending the event, and sText is the Text argument specified by the Microsoft documentation for this event. In the subroutine, we simply take sText and assign it to the Caption property of the Status object, which is the name that we gave to our Status bar at the bottom of our application window.
OK, how to we put this subroutine into our ZML file? Using the <script> tag. The <script> tag can appear anywhere in the ZML file and gets executed when the window is created. If the <script> tag is in the <head> section, then it gets executed immediately when the application is first loaded. So, in our main <window> section, we add the text:
<?xml version='1.0' encoding='ISO-8859-1' ?>
<!DOCTYPE zeus [
  <!ENTITY AppTitle "Zeus Demonstration Program">
  <!ENTITY AppAuthor "Zugg Software">
  <!ENTITY AppVersion "1.0">
  <!ENTITY AppURL "http://www.zuggsoft.com/">
]>
<zeus>
  <head>
    ...
  </head>
  <window name='main' caption='Zeus Demo' width="640" height="480">
    <script>
      sub Browser_OnStatusTextChange( Sender, sText)
        Status.Caption = sText
      end sub
    </script>
    <dock position='top'>
      <includebar name='mainmenu'/>
      <includebar name='maintoolbar'/>
    </dock>
    <panel align='top' height='22'>
      <button action='Navigate' align='right'/>
      <edit name='URL' caption='URL:' align='client' deltaleft='36'>&AppURL;</edit>
    </panel>
    <activex name='Browser' align='client' classname='Shell.Explorer'/>
    <statusbar name='Status' align='bottom'/>
  </window>
</zeus>
|
Yes, if our script had < or > or & characters we would need to use the &entity; reference, or else enclose this whole thing into a CDATA section. But since our script doesn't use any reserved characters, we don't need that complexity here.
OK, just for completeness, let's take all we have learned and quickly create the "About box" window for our application. This is going to look a lot like the splash screen:
<?xml version='1.0' encoding='ISO-8859-1' ?>
<!DOCTYPE zeus [
  <!ENTITY AppTitle "Zeus Demonstration Program">
  <!ENTITY AppAuthor "Zugg Software">
  <!ENTITY AppVersion "1.0">
  <!ENTITY AppURL "http://www.zuggsoft.com/">
]>
<zeus>
  <head>
    ...
  </head>
  <window name='main' caption='Zeus Demo' width="640" height="480">
    <script>
      sub Browser_OnStatusTextChange( Sender, sText)
        Status.Caption = sText
      end sub
    </script>
    <dock position='top'>
      <includebar name='mainmenu'/>
      <includebar name='maintoolbar'/>
    </dock>
    <panel align='top' height='22'>
      <button action='Navigate' align='right'/>
      <edit name='URL' caption='URL:' align='client' deltaleft='36'>&AppURL;</edit>
    </panel>
    <activex name='Browser' align='client' classname='Shell.Explorer'/>
    <statusbar name='Status' align='bottom'/>
  </window>
  <window caption='About Demo' name='about' borderstyle='dialog'>
    <panel align='bottom' height='28'>
      <button kind='OK' autocenter='true' top='0'/>
    </panel>
    <label align='client' bevelouter='bvLowered' deltatop='8' deltaleft='8' width='-8' height='-8'>
      <![CDATA[<p align="center"><br><b>&AppTitle;</b><br><br>
by<br>
&AppAuthor;<br><br>
<a href="&AppURL;">&AppURL;</a></p>]]>
    </label>
  </window>
</zeus>
|
Have you learned enough to figure this out? Let's go through it quickly. This defines a new window named "About" with a caption of "About Demo" and an attribute called "borderstyle" that can be used to control the type of border Windows uses for this window. In this case, we use the "dialog" style which is not resizeable and only has a "close" button in the upper-right corner.
Next, we have a panel aligned to the bottom of the window, with a height of 28. The panel has a button in it called "OK". Instead of just setting the caption property, we sent the "Kind" property. The Kind properly of a button is used to create standard pre-defined buttons such as OK, Cancel, Help, etc. We set the "autocenter" property to center the button horizontally in the panel, and set the top='0' to put the button at the top of the panel.
The <label> uses align='client' to use the rest of the window and looks a lot like the splash screen label. We again set a margin of 8 pixels around the control and give it a fancy bevel. Then we have a CDATA section to contain our HTML text so we don't have to use entities for < and > characters. We use the HTML <p> tag to start a paragraph and align it to the center. This creates centered text instead of the left-aligned text we had in the splash screen. Otherwise, we have the same entity references for the Version and Author. We also put in the URL for the application home page and use the HTML <A> tag to put a hyperlink within our text label. When this is displayed for the user, they can click on the hyperlink in the label and it will open the URL in their default web browser.
How does our About window get displayed? Well, remember the About <item> in the main menu? It had a script of:
core.execwindow( "About")
That displays and executes the <window> named "about" that we just created. It waits until the window is closed, which the OK button does as it's default action.
We are done. Here is the complete file you should have in Notepad:
<?xml version='1.0' encoding='ISO-8859-1' ?>
<!DOCTYPE zeus [
<!ENTITY AppTitle "Zeus Demonstration Program">
<!ENTITY AppAuthor "Zugg Software">
<!ENTITY AppVersion "1.0">
<!ENTITY AppURL "http://www.zuggsoft.com/">
]>
<zeus>
<head>
<splash>
<image image='emobius.gif' deltaleft='8' deltatop='8' width='64' height='64'/>
<label align='Client' bevelouter='Lowered' autoleft='true' deltaleft='8' width='-8' height='-8'>
<![CDATA[<b>eMobius</b><br><br>
eMail with a <i>twist</i><br><br>
Version &AppVersion;<br><br>
by &AppAuthor;]]></label>
</splash>
<action name='Navigate' caption='Go' image='world' script='Browser.Navigate( URL.Text)'/>
<action name='BrowseBack' caption='Back' image='arrowleft' script='Browser.GoBack'/>
<action name='BrowseForward' caption='Forward' image='arrowright' script='Browser.GoForward'/>
<action name='BrowseHome' caption='Home' image='home' script='Browser.GoHome'/>
<action name='BrowseStop' image='stop' script='Browser.Stop'/>
<action name='BrowseReload' image='redo' script='Browser.Refresh'/>
<toolbar name='maintoolbar'>
<item action='BrowseBack'/>
<item action='BrowseForward'/>
<item action='BrowseStop'/>
<item action='BrowseReload'/>
<item action='BrowseHome'/>
</toolbar>
<menu name='EditMenu'>
<item action='_EditCut'/>
<item action='_EditCopy'/>
<item action='_EditPaste'/>
</menu>
<toolbar name='mainmenu'>
<menu caption='&File'>
<item action='_FileExit'/>
</menu>
<menu caption='&Edit' submenu='EditMenu'/>
<menu caption='&View'>
<item action='BrowseBack'/>
<item action='BrowseForward'/>
<item action='BrowseHome'/>
<item action='Navigate'/>
</menu>
<menu caption='&Help'>
<item caption='&About' script='core.execwindow( "About")'/>
</menu>
</toolbar>
</head>
<window name='main' caption='Zeus Demo' width="640" height="480">
<script>
sub Browser_OnStatusTextChange( Sender, sText)
Status.Caption = sText
end sub
</script>
<dock position='top'>
<includebar name='mainmenu'/>
<includebar name='maintoolbar'/>
</dock>
<panel align='top' height='22'>
<button action='Navigate' align='right'/>
<edit name='URL' caption='URL:' align='client' deltaleft='36'>&AppURL;</edit>
</panel>
<activex name='Browser' align='client' classname='Shell.Explorer'/>
<statusbar name='Status' align='bottom'/>
</window>
<window caption='About Demo' name='about' borderstyle='dialog'>
<panel align='bottom' height='28'>
<button kind='OK' autocenter='true' top='0'/>
</panel>
<label align='client' bevelouter='bvLowered' deltatop='8' deltaleft='8' width='-8' height='-8'>
<![CDATA[<p align="center"><br><b>&AppTitle;</b><br><br>
by<br>
&AppAuthor;<br><br>
<a href="&AppURL;">&AppURL;</a></p>]]>
</label>
</window>
</zeus>
|
Save the file with notepad to "MYDEMO.ZML". Yes, include the double-quotes around the filename to force Notepad to save it exactly like that, otherwise it will append .txt to the end of the filename. Then double-click your file to run it. Or, the command line:
ZEUS MYDEMO.ZML
will also run it. You can see that we are loading are application by running Zeus and specifying our ZML file as the application filename. This will display the splash screen, then show your mini web browser. Click the Go button and it will navigate to the Zugg Software home page. You'll see messages in your status bar as it loads various items on the page. That's it! Your very own web browser (well, ok, it's still Internet Explorer inside).
As a side comment, Zeus can load application ZML files from a number of sources. Even external sources! Just specify the http:// or ftp:// link for your ZML file. Like this:
ZEUS http://www.emobius.com/zeus/mydemo.zml
This will actually load the same application you just made yourself, but it will load it remotely from the Zugg Software site. This allows you to develop applications and then put them on a central web server for other people to access. If you update your application on the web server, then everyone using it will automatically start using your new version. This can be very powerful, but never load an application from a source you do not trust. As with ActiveX controls, loading a Zeus application from a remote network site can do ANYTHING to your computer, so be sure you trust the site.
NEVER NEVER NEVER open a ZML attachment in your email client or your web browser. This is just like running an EXE file. This will execute a ZML application which can do anything to your system. If you are paranoid about this kind of stuff, there is an application setting for Zeus that will warn you whenever you try to run a Zeus application. This might be a pain to get prompted everytime you want to run something like eMobius, but it might save you from accidentally executing something you really don't want. And actually, you can set a list of "trusted" applications in Zeus and hardcode their location so that you are not prompted when they are opened, but are prompted when some undefined application is open. But you should consult the main Zeus documentation for more information on security issues like that.
Congratulations, you've just written your first Zeus Application. If you have ever written applications in other programming languages, you will appreciate how easy this really is. Most programming languages start out with a simple "Hello world" application. But that is so trivial that we did a whole mini web browser in Zeus. Using Visual Basic, Visual Studio, Delphi, or any other programming language, handling the complex user interface and ActiveX controls that we have used here is a lot harder. And the components used to build your Zeus application are much more sophisticated than your average programming language. As you can see, you already get powerful HTML labels, powerful image controls, and ActiveX controls. And there is more power waiting to be discovered. For example, the multi-line edit control called <memo> in Zeus has full "as you type" spellchecking available! Nobody else has that built into a development environment.
If you have used Mozilla to develop applications, you will see many familiar things here. You can go ahead and use JavaScript instead of VBScript if you want. (Hint, look for the <language> tag in the <head> section). But again, the components that you have available for your application are much richer than provided by Mozilla, and because Zeus is optimized for Windows, you can automatically use ActiveX controls and COM objects which are very difficult, if not impossible, to use in Mozilla.
If you are ready for more, go take a look at the other documentation available, or take a look at some of the other demonstration programs that come with Zeus. The "demo.zml" file is an expanded version of this demo showing some more functionality. The "editor.zml" file is a rich-text and HTML editor with full spellchecking. The "calc.zml" file is a simple but powerful calculator program.
Have fun!