In this example, we are creating a Temple area. So, first we create a standard zMUD map (in zMapper, not in zMUD). The procedure of creating this map is much like in zMUD. You can click on the Add Room tool in the toolbar, then click on the map where you want the room created. You can drag and drop the room to move it around, with either a grid-snap turned on or off. In this case, I've got the grid-snap turned on so that each room lines up.
To create connecting rooms, I can drop another room on the map, then click on the Add Link tool and create the link between the rooms. Or, like in zMUD, I can turn on the "keyboard creation" option, then use the number-pad to create rooms as I move around. So, first I dropped the left-most room. Then I pressed '6' on the number-pad to create a linked room to the east. Then I pressed '8' to create a room to the north, then pressed '2' to move back to the previous room to the south, then pressed '2' again to create a new room south. Then, to finish, I pressed: 8, 6, 8, 2, 2, 8, 6, 6.
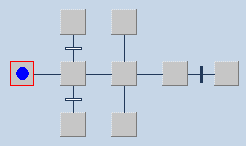
Opening the room properties window, I then entered a name for each room. The room on the left, with the blue "current location" marker in it, is the "Outside the Temple" room. The next room to the right is "Temple Entrance", with the room to the north the "Closet" and the room to the south the "Reception Room". Next, to the east is the "Inside Temple" room, with the "Donation Room" to the north, and the "Healing Room" to the south. Next, to the east is the "Altar", and finally to the east again is the "Vault".
I then right-clicked a couple of the links to add the doors. For the door to the vault, I went into the room properties and selected the "Locked" property of the door.
The resulting map is shown below. All of this can currently be done in zMUD. This is a fully functional MUD map that can be loaded into zMUD.
OK, now it's time to customize the map using the features unique to zMapper. First, we want to change the size of the rooms to eliminate the display of the links between the rooms. NOTE: We are not deleting the links...we are simply moving the rooms close together so that the links don't get drawn.
To resize a room, we right-click the room and select Resize, or we Ctrl-Click on the room. In the picture, we have Ctrl-clicked on the Vault (the right-most room) to display the resize handles.

Note that rooms can have any rectangular shape at this point. Even though the lines linking the rooms together are no longer shown, the doors are still correctly shown.
Now that we've defined the basic shape of the rooms, we can now assign a detailed shape to each room using the Shape Editor. This is where is gets really cool! The shape for a room can be *anything*. The Shape Editor is similar to the drawing tools in the Microsoft Office programs. You can add lines, rectangles, circles, polygons, etc. You can change fill colors, line colors, line widths, fonts, etc.
To change a room shape, you simply double-click on it. That loads the current shape into the shape editor. You can then start adding objects to the shape however you want. You can turn on or off the "Default Drawing" option for each room. This controls whether the normal gray box is drawn for the room. In this example, we have turned off the Default Drawing for each room so that we can completely customize the look of each room.
In the "Outside the Temple" we add some stairs, a couple of benches, and a couple of green trees (simple circles for now). In the "Temple Entrance" we add some columns and a raised fountain area. Then, the "Inside the Temple" gets some columns and a bunch of pews. The "Altar" gets some steps and an altar, and we add various items to all of the other rooms.
Here is the completed map (took about 10 minutes to create all the shapes) with the final "Vault" room selected. Notice that when a room is selected, the entire shape turns red.
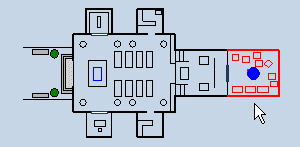
We have also put the Current Location marker in the Vault room (the blue circle). You can still move around the map using the keypad, just like with the original zMUD map. As you move from room to room, the entire room turns red just like the Vault room above.
To see what the actual Shape Editor looks like, we double-click on the Vault room.

Notice that the right-side of the screen looks like most common graphics editors. In this case, we have clicked on one of the boxes on the screen. To the left of the shape window is the raw "dump" of the Windows Meta File that is used to represent this shape. The "Rectangle" object is highlighted and we can see it's properties. Notice that there is a Pen object above the rectangle...that defines the pen used for drawing this rectangle. We can manually edit the numeric values like Left, Top, Right, Bottom, or we can just drag and drop the selection points on the graphical map on the right. So, you can use the editor just like a normal interactive graphics editor, using the mouse, or you can dig into the fine detail of the raw numerical data and edit that.
For example, the current version of the Shape Editor doesn't have any graphical way to change the width of the pen. So, to get the wide lines around the outside of the room, we had to click on the CreatePen object for the line and edit the Width parameter manually.
Since the Shape Editor uses the Windows Enhanced Metafile standard, you can actually create your shape in *any* graphics program, then just Copy and Paste it into the zMapper Shape Editor. So, even though the Shape Editor doesn't have fancy tools (yet) for gradient fills or other functions, you can still create those shapes elsewhere and paste them into zMapper. The possibilities are endless!
Along the top of the window is the normal Windows menu, then the Font selector for text objects, then the Font Color, Line Color, and Fill Color controls for interactively selecting colors. The rectangle we have currently selected has a Fill Color of "None" to make it transparent. After the color selectors comes the "Default Drawing" toggle button, and finally the "Apply Changes" button. When you click Apply Changes (or close the window), any changes you have made to the room are displayed back on the main map.
The toolbar in the center of the window is for selecting the drawing tools. The top tool is the "Selection" tool for selecting objects by clicking on them. The next tool is the Area selection, which allows you to select multiple objects, or to draw a selection box that you can clip the image to. The next tool is the Line tool, then the Rectangle tool, then the Polygon/Polyline tool, then the circle tool. More tools will be added to the Shape Editor before it ships.
Let's go back to the main zMapper window. Here is the entire window with the completed map loaded:

Looks a lot like the zMUD mapper, doesn't it! In fact, it shares a lot of code with zMUD. The display routines are identical, so this map will look exactly the same when loaded into the zMUD mapper window. The difference is that you can only edit the shapes, room size, etc when in zMapper. In zMUD you can move around the map, and even drag rooms to a new position, but you can't edit any of the details.
I hope this gives you a better idea what zMapper is all about and should give you a basic understanding of how you can enhance zMUD maps using zMapper, or how you can create detailed maps of anything you want from scratch.